

How To Setup Automatic Email Alerts for AWS EC2 Running Instances and Save $$$
An easy way to setup email alerts for you to remind you (or your team) to shut down AWS EC2 instances at the end of the day!


I think all of us* have made the mistake of keeping an EC2 instance on AWS running the entire night and ending up with a massive bill. A simple way of preventing this is to setup up email notifications that alert you (or your team) of the running EC2 instances in your AWS region and remind you to shut down instances which are not supposed to be running.
* - "all of us" may or may not be limited to people using AWS EC2 😆
This can be achieved quite easily using some AWS services, few of which you might already be familiar with. Also, not only will this help you reduce undue billing hours on your EC2 instances but also won't cost you anything - if you choose to run 1-2 alerts daily, all the of AWS services come under the Free Tier usage - that means your email alerts cost $0.00!
(You can check how much your usage of email alerts will cost by using AWS Pricing Calculator)
If you aren't familiar with the AWS services being used, you can take a look at the description of each in the first section. Otherwise, you can skip to the second section and start setting up the alerts.
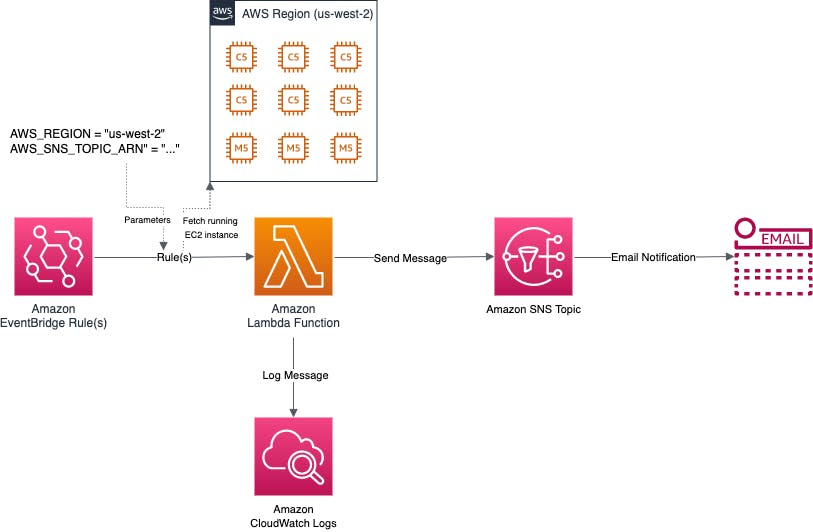
Design
EventBridge: Helps you create scheduled triggers (called "rules") to run the Lambda function.
Lambda: Lambda is a server-less compute platform. A Lambda function (written in Python) is used to collect the number of running instances based on the region and send a message to SNS.
SNS: SNS is a notification service in AWS. Once the configured SNS topic receives a message from the Lambda function, an email to sent to all the email addresses that have "subscribed" to that topic.
CloudWatch Logs: Helps us maintain a separate backup of the message in case of any errors.
Setup
The one-time setup should take 30 minutes to completed. After the one-time setup, adding new alerts should take less than 30 seconds!
One-Time Setup
In this section we will setup the IAM role, the SNS topic and configure the emails that need to be subscribed for the alerts.
IAM Policy and Role Setup
Note: As a best practice, AWS recommends you define permissions for only specific resources in specific accounts. For the purpose of this tutorial, I have not used resource specific permissions, but please configure your IAM policy with greater precision if you know how to do so.
Navigate to the Amazon IAM page (you can search for IAM in the search bar), and then the Policies section. Click the "Create policy" button to create a new IAM Policy.
- In the first page, click the JSON tab. Copy the below JSON and replace the existing JSON. Click "Next".
{ "Version": "2012-10-17", "Statement": [ { "Sid": "VisualEditor0", "Effect": "Allow", "Action": [ "sns:Publish", "ec2:DescribeInstances", "logs:PutLogEvents", "logs:CreateLogStream", "logs:CreateLogGroup", ], "Resource": "*" } ] } - In the second page, you can add "Tags" optionally. Click "Next".
- In the final page, update the "Name" as AWS-EC2-Running-Alerts-Policy or as per your choice, and click "Create policy".
- In the first page, click the JSON tab. Copy the below JSON and replace the existing JSON. Click "Next".
Navigate to the Amazon IAM page (you can search for IAM in the Search bar), and then the Roles section. Click the "Create role" button to create a new IAM role.
- In the first page, for "Select type of trusted entity", choose AWS service. For "Choose a use case", choose Lambda. Click "Next".
- In the second page, for "Attach permissions policies", search for and select AWS-EC2-Running-Alerts-Policy. Click "Next".
- In the third page, you can add "Tags" optionally. Click "Next".
- In the final page, update the "Role name" as AWS-EC2-Running-Alerts-Role or as per your choice.
In the Review section, your final role should look like this:
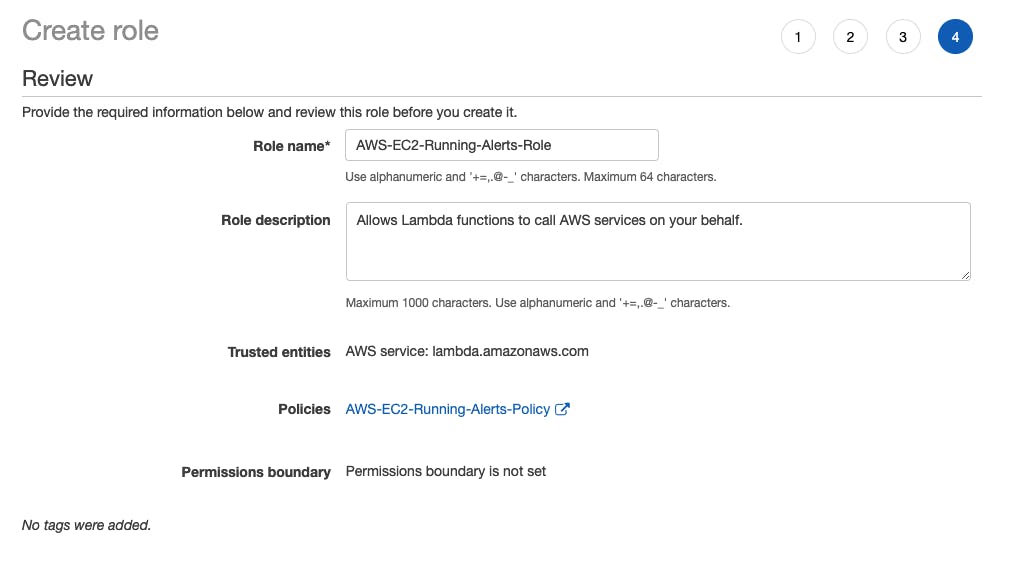
After reviewing the IAM role, click the "Create role" button.
SNS Topic Setup and Subscriptions
Switch to the region you want to create your alerts in. Example: Oregon (us-west-2).
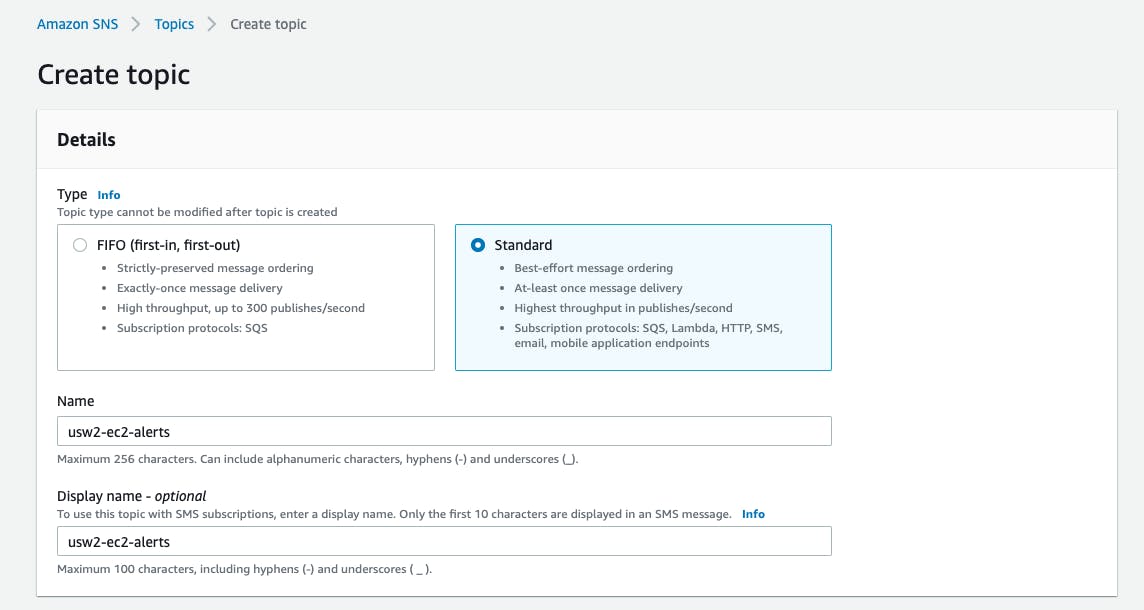
Navigate to the Amazon SNS page (you can search for SNS in the Search bar), and then the Topics section. Click the "Create topic" button to create a new Topic. Enter "usw2-ec2-alerts" or a name of your choice. Choose the Standard type. Keep the rest of the settings as default.
Once the topic is setup, you can add one or more email subscriptions for the alerts. Navigate to the topic you created under Amazon SNS -> Topics. Click the "Create subscription" button and add the email address you want to the alerts to be sent to.
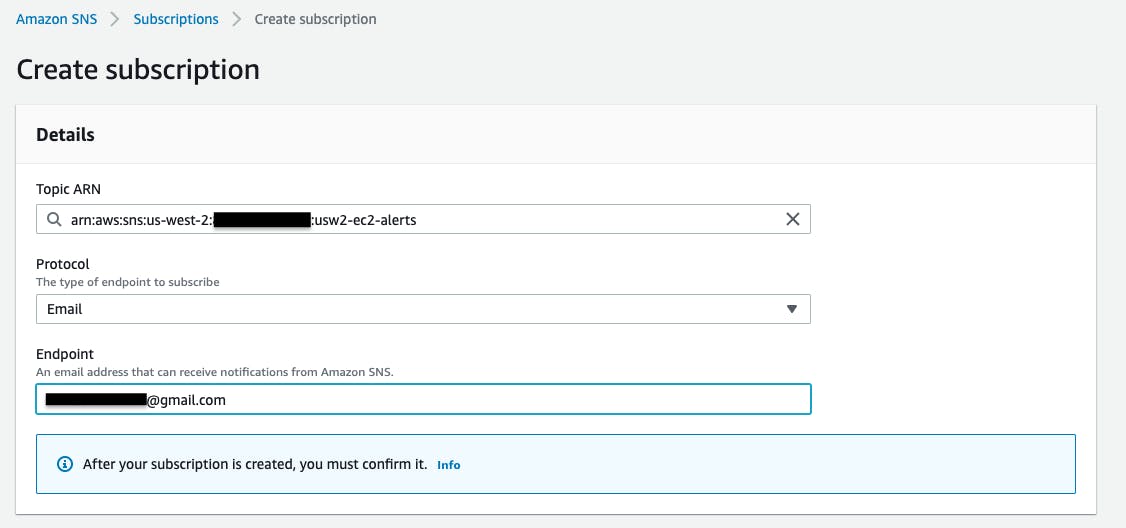
Once you add a subscription, an email will be sent to the email address which will need to be confirmed by the owner of the email address. You can track the subscriptions under Amazon SNS -> Topics -> Your Topic Name -> Subscriptions. After the confirmation, the status should change to Confirmed.

You can always come back to this page and add more email subscriptions whenever you need to.
Lambda Function Setup
Switch to the region you want to create your alerts in. This should be the same region where you have created your SNS topic. Example: Oregon (us-west-2). Navigate to the Amazon Lambda page (you can search for Lambda in the Search bar).
Click the "Create function" button.
- Keep the option to create your function as Author from scratch.
- Update the "Function name" as AWS-EC2-Running-Alerts-USW2 or as per your choice.
- Select the "Runtime" as Python 3.8
- Keep the "Architecture" as x86_64
- For the "Permissions", select Use an existing role. Select AWS-EC2-Running-Alerts-Role from the dropdown.
Your configuration should look like this:
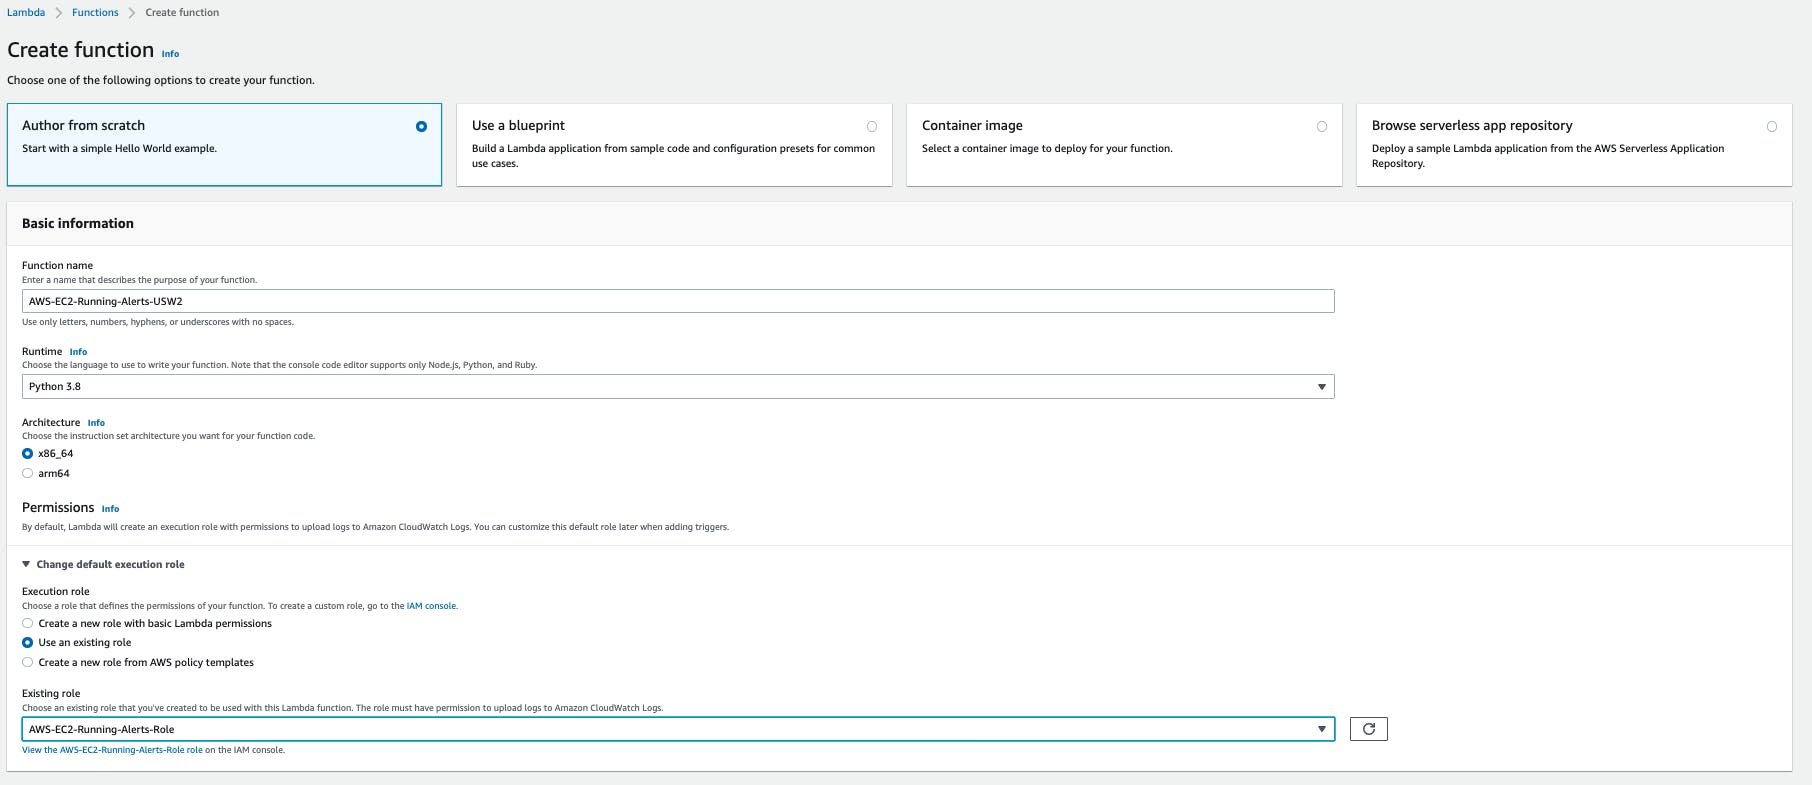 After reviewing the configuration, click "Create function".
In the "Code" section, replace the existing code with the below code. Make sure to replace the AWS_REGION and AWS_SNS_TOPIC_ARN as per your region and SNS topic ARN respectively.
import boto3
import logging
LOGGER = logging.getLogger()
LOGGER.setLevel(logging.INFO)
ec2 = boto3.client('ec2')
sns = boto3.client('sns')
def lambda_handler(event, context):
try:
# Example:
# AWS_REGION = 'us-west-2'
# AWS_SNS_TOPIC_ARN = 'arn:aws:sns:us-west-2:xxx:usw2-ec2-alerts'
AWS_REGION = 'region'
AWS_SNS_TOPIC_ARN = 'sns topic arn'
# The filter value 16 refers to instances in the Running state
response = ec2.describe_instances(
Filters=[
{
'Name': 'instance-state-code',
'Values': [
'16',
],
}
],
)
count = 0
running_instances = []
for reservation in response['Reservations']:
for instance in reservation['Instances']:
if 'Tags' in instance:
for tag in instance['Tags']:
if tag['Key'] == 'Name' and tag['Value']:
count += 1
running_instances.append(tag['Value'])
aws_ec2_console_url = f"https://{AWS_REGION}.console.aws.amazon.com/ec2/v2/home?region={AWS_REGION}#Instances:instanceState=running"
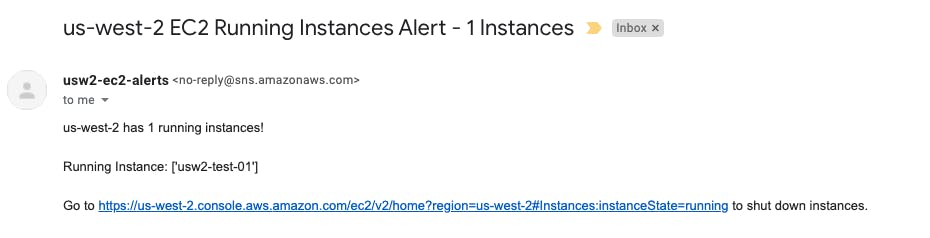
message = f"{AWS_REGION} has {count} running instances!\n\nRunning Instance: {running_instances}\n\nGo to {aws_ec2_console_url} to shut down instances."
subject = f"{AWS_REGION} EC2 Running Instances Alert - {count} Instances"
LOGGER.info(count)
LOGGER.info(message)
message_status = sns.publish(
TopicArn=AWS_SNS_TOPIC_ARN,
Subject=subject,
Message=message)
except Exception as err:
LOGGER.error(err)
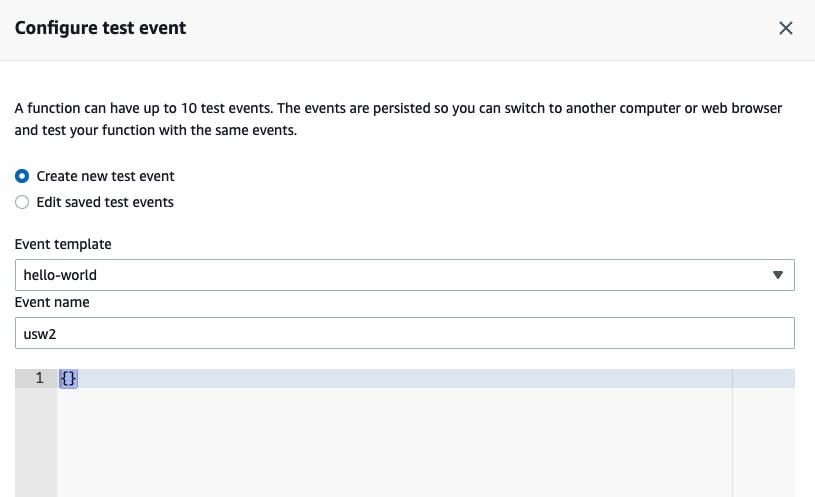
Deploy the changes by clicking the "Deploy" button. Then click the "Test" button to create a test event. Give any name for the test event and replace the context area with an empty JSON (
{}):
Using the "Test" button run a test event and check the logs. You should see the logs in the "Execution results" tab.

You should also get an email for all the email addresses you have configured earlier.
You can go to CloudWatch -> Logs -> Log groups to find the logs.
Adding Alerts
Switch to the region you want to create your alerts in. Example: Oregon (us-west-2). Navigate to the Amazon EventBridge page (you can search for EventBridge in the Search bar), and then the Rules section.
Click "Create rule".
- Update the "Name" with AWS-EC2-Running-Alerts-USW2-1230UTC or as per your choice.
- For "Define pattern" as "Schedule". You choose to run the alert a fixed rate every few hours or enter a cron expression. For this example, I am setting up an alert for 12:30 PM UTC / 06:00 PM IST, so the cron expression would be
30 12 * * ? *. - For "Select targets", first select Lambda function if it is not already chosen. Then select the Lambda function created earlier. In this example, it is AWS-EC2-Running-Alerts-USW2.
- Keep the default value for the other settings and click "Create".
You can create more rules with the different cron expressions by repeating step 2. You can use the reference provided by AWS to make the cron expressions.
Conclusion
In this article you learn how to create simple email alerts for EC2 instances running in your AWS account. This gives you (or your team) a gentle reminder to shut down instances at the end of the day and in turn reduce your billing costs!
You can start by creating alerts in one of your AWS regions and expand to other regions by following the same steps if your infrastructure is spread across multiple regions.
References